photo BlogButton_zpsf979d556.jpg  photo AboutMeButton_zps0d48ecc3.jpg  photo FinishesButton_zps92f1f16c.jpg  photo TutorialsButton_zps33a38379.jpg  photo RTQLabel_zps71a4ad0f.jpg

28 September 2014

Liberty Boxy Pouch

Liberty Triangle Boxy Pouch
Liberty and Linen boxy pouch. 

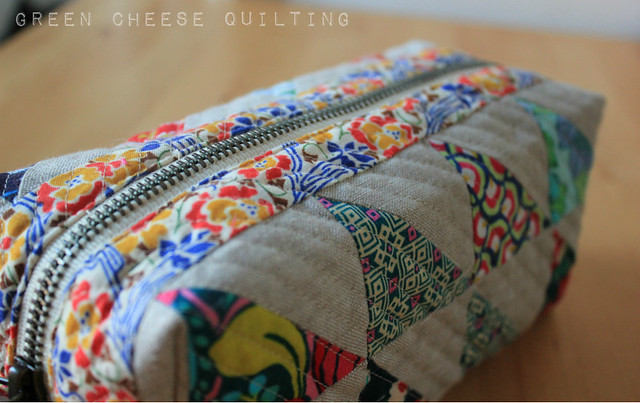
In between my EPP project and working on the baby quilt for my old roommate I had to sneak in a project for myself. I thought I was sick of my Liberty scraps, but I saw them peaking out of that scrap bucket and just had to play around with them. I decided to pair the scraps with some linen, possibly essex linen, but I'm not sure. I made a whole bunch of half square triangles using the last of my leftover scrappy trip squares and the linen. Then, I machine quilted diagonal lines roughly half an inch apart, roughly parallel to the diagonals in the triangles. Note my aversion to precision.

Liberty Triangle Boxy Pouch
Quilted triangles. Love the resulting texture, both between textiles and with the added quilting. 

I ended up compiling different parts of different tutorials to make this pouch. One of my favorite parts is the zipper. I bought some metal zippers off of etsy, and I had some leather scraps from a friend. This has encouraged me to obsess over leather zipper pulls, although making them is another story.

Liberty Triangle Boxy Pouch
Zipper pull. I can make it better!

I like how quilting the outer panels adds enough structure to the bag that it can stand on its own, without adding so much bulk that all the seams are impossible to sew without breaking a needle (no needles lost during the making of this bag). I did end up adding extra strips of fabric along the top of my panels before quilting because I realized there was no way I'd get a decent sized bag otherwise. I like the effect, although I wish I'd been able to cut it straighter. The panels warped a little bit during the quilting process.


Liberty Triangle Boxy Pouch
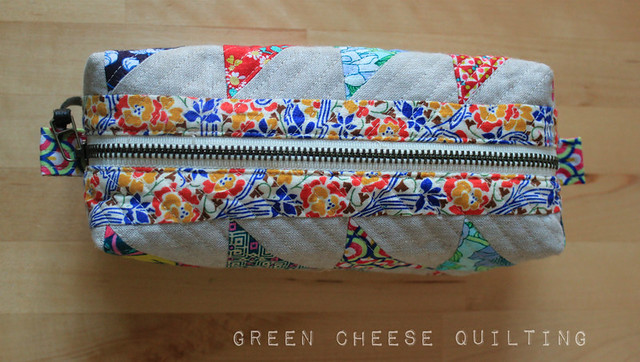
All Liberty, all the time. 

The interior lining is a magenta pink linen. It was not fun to work with. Considering how many seams I had to unpick and resew, linen was a terrible choice. There was so much fraying! (Lesson noted, but probably not learned.)  

Liberty Triangle Boxy Pouch
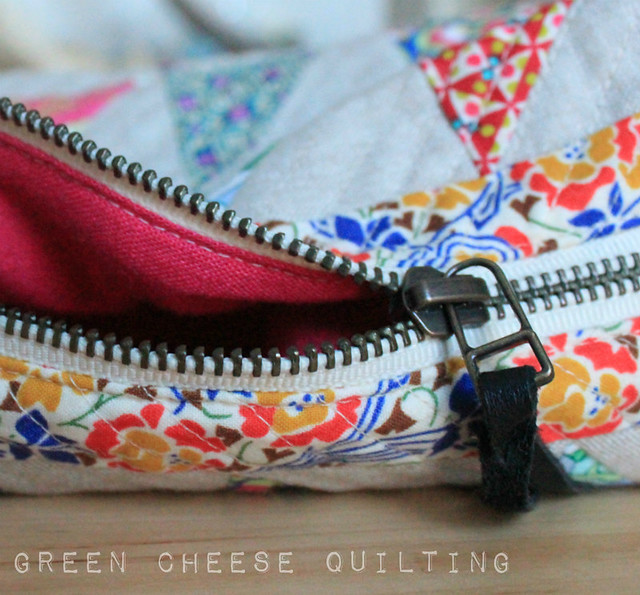
Close up of the lining, and a little zipper detail. 

For my next boxy pouch, I've got some great NEON fabric. I've been mulling over some construction ideas for a while. I'm hoping I'll get the chance to MAKE it soon, and then I might even SHARE it! In the meantime, I'll be binding that baby quilt!

24 September 2014

How I English Paper Piece - Part 2: Joining Hexies

I'm moving right along with my paper piecing project. I thought I had all the hexagons basted, but turns out I think I need more than I initially calculated to make the panels bigger for the project I've got in mind. In the meantime, I thought I'd show how I attach the hexagons, and then how I attach the rows to make a panel. Plus I just painted my nails, so I figured I should take advantage of them before they get all chipped and I don't want to show them in the pictures!

When I connect the hexagons I use a ladder stitch. The thread moves back and forth between the fabrics, creating a ladder shape. Because the stitches are concealed by the fabric creases it makes the join nearly invisible.

 photo ladderstitch_zps3ffab75e.jpg
Look at the 'ladder' the thread makes between the two hexagons!

I think I just got ahead of myself. First I take two of my basted hexagons.

 photo startingpoint_zpsd8c69a92.jpg
2 basted hexagons. 
Next, I place them right sides together, aligning the edge I want to connect them along. I insert a needle with a knotted thread between the fabric and the basting paper, exiting at my starting point, which, for me, is the right corner (I sew from right to left and I'm right handed. I have no idea if this is normal, this is just what feels most comfortable to me, and you should find what is comfortable to you).

 photo insert_thread_zps95cb8af9.jpg
My blurry starting point. I swiveled them a bit so you can see they are right sides together.
When sewing you'll see they are lined up right next to each other. 

For the first stitch I insert the needle into the other hexagon, through the right corner and run it along the fold about 1/4 or 1/8th of an inch. These are 1/2 inch hexagons, so I'm using smaller stitches. For a larger hexagon you could use a larger stitch.

 photo ladder1_zpsee39c26d.jpg
Insert needle and run it along the folded fabric a little ways
before coming out of the same fabric. 

For the next stitch, you want to do the same thing back on that first hexagon. Enter at a parallel point in the new hexagon from where you left the old one. I've highlighted this in the picture below. You can see the exit point illustrated with the finger in the image, and the entering point illustrated with the pink and blue arrow.

 photo ladder21_zpscfb7b3a7.jpg
finger = exiting old stitch; triangles = entering new stitch

You will continue in this fashion until you reach the end of the side. For the final stitch I just do a back stitch in whichever hexagon I DID NOT put the last ladder stitch. Then I knot and cut the thread and start the process over again adding the next hexagon.

 photo ladderstitchcollage_zps9e8402fe.jpg
Sewing the hexagons together. 

I'm sewing my hexagons into rows, and then sewing the rows together. I'll show how I do that in my next tutorial post.

 photo coupled_hexies_zpsb34306e8.jpg
Conjoined hexagons!


 photo 2rows_zps8519eeba.jpg
Rows of hexagons. I like how graphic Arizona looks using this method. 

18 September 2014

How I English Paper Piece - Part 1: Basting

I've been working my way towards a new glasses case for a little while. I had one more kiss clasp left over from the three I originally bought, and I had purchased some English Paper Piecing (EPP) templates on a whim. Usually I would be true to my frugal self, and print out and hand cut templates if I wanted to try a new style of sewing, but I had just made a good deal, celebrated with a drink and ended up at a quilting shop...you know what happens when you end up at a quilting shop after a drink or two, right? English Paper Piecing templates on a whim!

It took me a while to decide how to use them. I did, after all, buy a rather small size (they were so cute!) measuring 1/2 inch along each side. I ended up putting the templates aside for a bit. Later, I purchased a fat quarter bundle of Arizona, April Rhodes' limited edition collection, because it was beautiful, and it was a LIMITED EDITION. That's basically code for BUY IT NOW! Determined not to let this new acquisition languish in my collection I thought it would be fun to see how all the geometric elements of the collection looked broken down a bit, and have decided that these paper pieced hexagons will be the perfect way to create a panel for my glasses case.

So, here I am showing you some of my process. I'd love to do this more with quilts, but my process tends to be so organic that it's hard to keep track of what I do! This is my first attempt at a good chronicle of my work, and I hope you enjoy following along.


 photo image_7_zpsf3f87fb2.jpeg
Arizona hexagons, front and back. 

Everyone has a different method of EPPing, and I thought I'd start by sharing mine. With pictures. If you like it, try it. If not, there are plenty of other tutorials out there for you, and I'm sure you'll find one that fits!

For my 1/2 inch templates I initially cut 1.5" squares from each of the fabrics I was going to be using.


 photo image_zpse9622f7a.jpeg
1.5" square of fabric

Next I trimmed the corners off. I didn't cut much, just about 1/4" from each corner.


 photo image_1_zpsfe0b3ef4.jpeg
Trimmed fabric. 

You can see here that the fabric better fits the template now. Notice that I didn't actually trim the fabric to a hexagon, I just trimmed off some of the excess. 


 photo image_2_zps62ecdeee.jpeg
Fabric with template. 

The next step I take is to finger press two of the opposite sides of the fabric. These sides should be parallel to the template. For example, I would finger press the top and bottom sides in the picture above. This helps prevent the template from moving around while basting. Just a note, but when I first heard of finger pressing, I though all you had to do was fold the fabric over with your finger and press! Turns out, you need to fold the fabric over and run the edge of your finger (preferably using your fingernail) along the fold you want pressed, otherwise it's not nearly as effective.


 photo image_3_zpsde0182ee.jpeg
Finger pressed fabric. 

I don't like using knots, because that takes time. When you have to baste 102 little hexagons, you don't want to make 204 knots (one at the start, one at the end). What I do is run the needle through the fabric once leaving about a 1-inch tail, and then once again in the same spot. This holds the thread firmly enough in place that your basting stitches will hold. 


 photo image_4_zps58e8026a.jpeg
First and second stitch in the same spot. 

After the initial stitches, fold the next edge of the hexagon down. Simply stitch once through the two layers of fabric. I don't go through the stiffer paper template to help prolong it's life. I mean, I may have bought them on a whim, but I want them to last a while!


 photo image_5_zps4a52d58f.jpeg
Regular running stitch around the hexagon to secure the fabric. 

Upon arriving at the last fold I repeat the same method used at the start: two stitches to secure the fabric.


 photo image_6_zps5385553b.jpeg
Final stitches to secure the basting threads. 

This method secures the fabric around the hexagon and prepares it for the next step: joining hexagons! It manages to secure the fabric without going through the cardboard, or making multiple knots for each template, which saves time and makes the process more economical. I've got about 25 more to go, and then I'll show you how I join my hexagons. I'm going to use a ladder stitch, which is virtually invisible, and super easy to do.